Текст в Blender Game Engine
В этом уроке Вы узнаете, как добавлять текст в игру, изменять его цвет, размер, шрифт… Как переносить длинные строки текста с помощью скрипта, а также научитесь создавать счетчик боеприпасов.
Добавление текста
Blender может использовать текст в режиме реального времени в игровом движке. Создайте новую сцену, перейдите на вид из камеры, расположите 3D-курсор в левом верхнем углу и добавьте объект Text. Скорее всего выровняется он относительно глобальных координат. Вы можете вручную повернуть его, но лучше перейти в настройки (User Preferences) и на вкладке Editing изменить опцию Align To на View. Таким образом вновь созданные объекты будут выравниваться относительно текущего вида, а не глобальных координат. Теперь запустите игру (P) и вы увидите в ней Ваш текст: 
Изменение разрешения шрифта
Не трудно заметить, что качество надписи оставляет желать лучшего. Мы может улучшить его двумя способами. Вы можете отдалить текст от камеры и увеличить его в размерах (при необходимости) или же написать небольшой скрипт на Python. Лучше использовать второй способ 🙂
Добавьте окно Text Editor, создайте новый файл с названием «text_res» и вставьте в него следующий скрипт:
cont = bge.logic.getCurrentController() own = cont.owner own.resolution = 5
Не снимая выделения с текста, перейдите в окно Logic Editor. Добавьте сенсор Always и подключите его к контроллеру Python. Для контроллера укажите использовать скрипт под названием «text_res«. Запустив игру Вы заметите что текст стал значительно лучше выглядеть. Изменяйте значение resolution до тех пор, пока не достигните желаемого результата, но не устанавливайте слишком высокие значения, иначе игра начнет подтормаживать. Значение 1 является разрешением по умолчанию. Начинайте со значения 2 и так до достижения результата: 
Так значительно лучше: 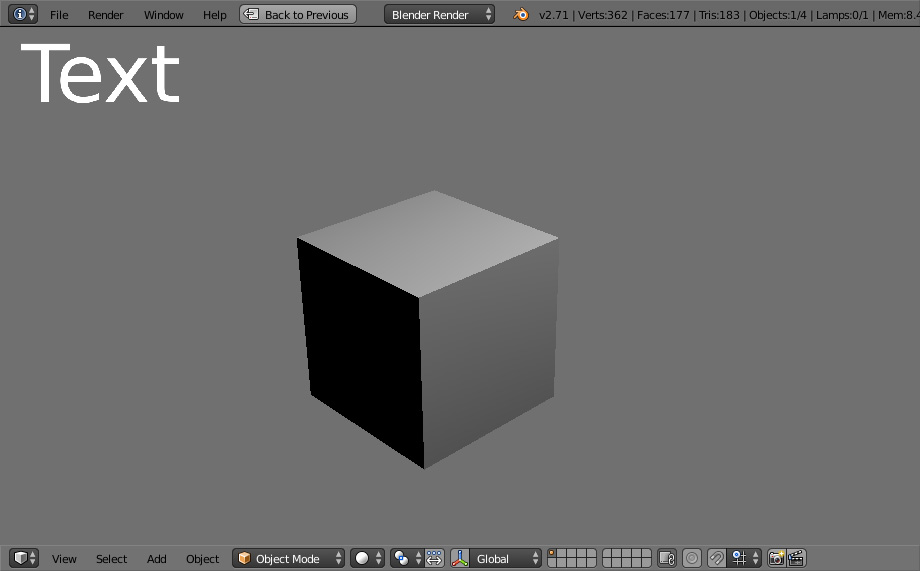
Настройка внешнего вида шрифта
Вы можете изменить цвет шрифта изменив цвет объекта. Для этого перейдите на вкладку Object и измените параметр Object Color. Сам шрифт можно изменять на вкладке шрифта: 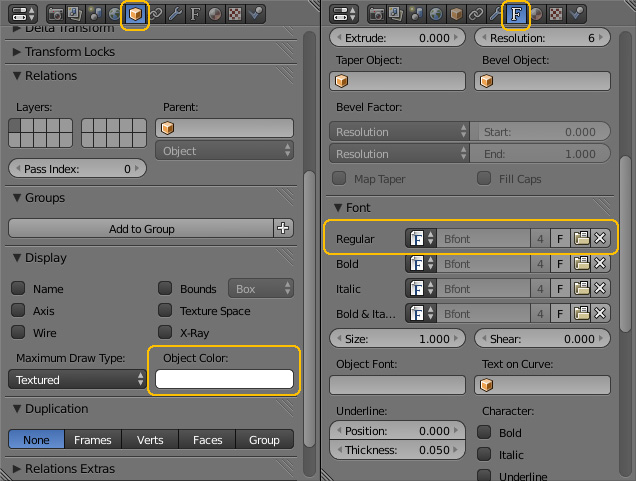
Добавление текста в игру (HUD)
Теперь, когда мы знаем как добавлять и настраивать текст займемся созданием игровой сцены, в которой будет присутствовать Head-Up Display (HUD). Также, Вы узнаете как форматировать длинные строки текста (создавать переносы) при помощи Python и логических блоков.
Когда Вы откроете файл, то заметите что в нем уже присутствуют камера и куб из предыдущего урока. Также, для куба и камеры была добавлена анимация ходьбы, чтобы перемещение по сцене было более реалистичным. На вкладке рендера частота обновления установлена равной 60 кадров в секунду для более плавной анимации.
Нажмите P, чтобы запустить игру. Перемещение по ней производится при помощи W,A,S,D + мышь, а также можно приседать с помощью Ctrl.
В центре сцены находится коробка с боеприпасами. Как только Вы ее подберете, она исчезнет. Нашей целью будет выводить на экран количество собранных боеприпасов. Для этого нам понадобится новая сцена, которая будет выступать в качестве HUD: 
Переименуйте новую сцену в «HUD«. Перейдите на вид спереди и добавьте в сцену камеру. Сместите камеру в сторону от центра оси координат. Теперь перейдите на вид из камеры и добавьте слева вверху текст, как мы делали это в начале урока. Измените надпись на «Ammo:» и при желании настройте разрешение, цвет и шрифт для текста. Затем продублируйте надпись, сместите ее немного вправо и измените ее на «0«. Этот второй текст будет выступать в роли счетчика каждый раз, когда куб (наш персонаж) будет соприкасаться с боеприпасами.
С выделенной надписью «0» в окне Logic Editor на панели свойств добавьте для него новое свойство «Add Text Game Property«. Измените тип на Integer (целое число). После этого займемся настройкой вывода HUD в сцену с игрой: 
Переключитесь на сцену с игрой и выделите камеру. В окне Logic Editor соедините сенсор Always, контроллер And и актуатор Scene. Измените режим актуатора на Add Overlay Scene и укажите использовать сцену HUD: 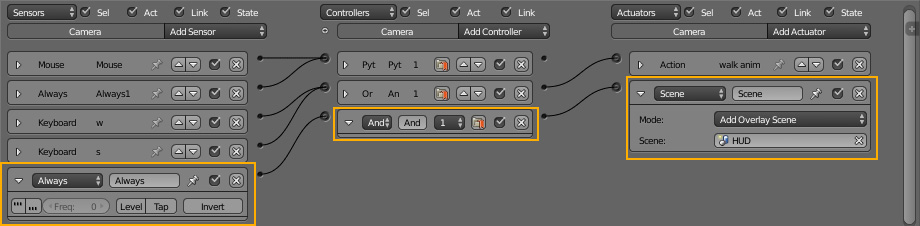
Теперь запустите игру и в ней Вы должны увидеть созданный текст в сцене HUD: 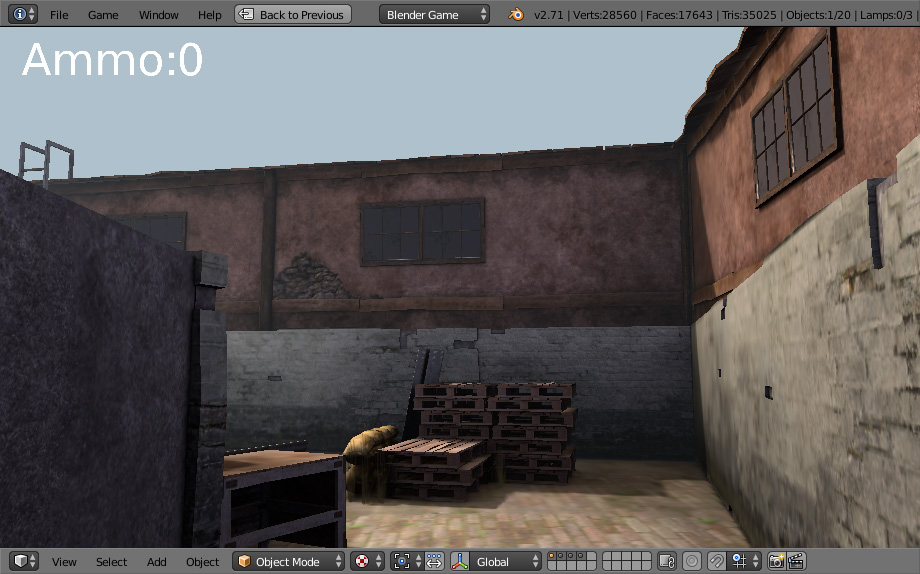
Выделите коробку с боеприпасами в центре сцены. Вы заметите что у нее уже присутствуют логические блоки отвечающие за ее вращение и исчезновение при столкновении с чем-либо.
Добавьте актуатор Message и подключите его к тому же контроллеру, что и сенсор Collision. В поле Subject введите «ammo«. Теперь при столкновении с персонажем боеприпасы будут исчезать и отправлять сообщение «ammo«: 
Переключитесь на сцену HUD и выберите счетчик. Добавьте сенсор Message и в поле Subject введите «ammo«. Подключите его к контроллеру And, а контроллер к актуатору Property. Измените его режим на Add, Property на Text и установите Value равным 1. Вся эта связка добавляет единицу к переменной Text когда получает сообщение «ammo»: 
Вернитесь в сцену с игрой, запустите ее и подберите коробку. Счетчик должен измениться с 0 на 1. Вы можете продублировать коробку с припасами несколько раз, расположить ее в разных частях сцены и попробовать собрать их все.
Перенос слов
Если в Вашей игре присутствуют длинные диалоги, то скорее всего Вы захотите выводить их параграфами. Можно сделать это вручную, добавляя «\n» в код скрипта или же использовать для этих целей отдельный модуль. С помощью этого модуля можно взять длинные строки и разделить их на отдельные линии определенной длины. Использование моноширинных шрифтов дает наилучший результат, так как длина линии определяется по количеству символов в ней, а не по ширине линии в пикселях.
Перейдите в сцену HUD. Чуть ниже надписи «Ammo» добавьте новый объект Text. Если нужно, отредактируйте разрешение. На вкладке шрифта измените шрифт на моноширинный, например Courier. В окне Logic Edotor добавьте новое свойство «Add Text Game Property» и оставьте тип String (строка). Создайте новый текстовый файл, назовите его «text_wrap» и вставьте в него следующий скрипт:
import textwrap cont = bge.logic.getCurrentController() own = cont.owner startmessage = «Welcome to this tutorial on text in the game engine.» own[«Text»] = textwrap.fill(startmessage, 20)
Добавьте сенсор Always и соедините его с контроллером Python, в котором указан скрипт «text_wrap«. Запустите игру и посмотрите на результат. Переменная startmessage хранит наш текст, который нужно вывести. Переменная own[«Text»] изменяет объект текст и с помощью функции textwrap.fill(startmessage, 20) выводит его строками по 20 символов: 
Этот текст будет отображаться на экране на протяжении всей игры. Очевидно что в этом нет нужды, поэтому его нужно убрать по истечению некоторого времени.
Выделите надпись и добавьте для нее сенсор Delay, контроллер And и актуатор Visibility. Delay установите равным 200, а в актуаторе Visibility отключите пункт Visibility. Эта связка говорит, что после 200 «тиков» (по умолчанию 60 «тиков» = 1 секунда) надпись исчезнет с экрана. Запустите игру и проверьте работу. 
На этом урок закончен! Вы также можете использовать любые другие функции по работе с текстом: capitalize(), lower(), upper() и т.д.
Text EditorпѓЃ
HeaderпѓЃ
The newly opened Text editor is empty, with a very simple header. More options become available when a text file is created or opened.


Text header with a text loaded. пѓЃ
The standard editor selection button.
Resolves modified file conflicts when an external text file is updated from another program.
Opens the file from drive again, overriding any local changes.
Make Text Internal
Converts the external text data-block into an internal one.
Hides the warning message until the external text file is modified externally again.
A data-block menu to select a text or to create a new one. After that the header will change.
Run Script (play icon)
Toggle display options.
Line Numbers, Word Wrap, Syntax Highlighting
Script Node Update (refresh icon)
When an OSL-file is opened, this updates the Shader Script node with new options and sockets from the script.
View MenuпѓЃ
Displays the text file’s line numbers on the left of the Main View.
Wraps words that are too long to fit into the horizontal space by pushing them to a new “pseudo line”.
Colors special words, in the Main View, that are used in the Python programming language.
Emphasizes the active line by altering the color of the background.
Moves the view and cursor to the start of the text file.
Moves the view and cursor to the end of the text file.
Moves the cursor to the start of the current line.
Moves the cursor to the end of the current line.
Moves the cursor to the same position in the line above the current line.
Moves the cursor to the same position in the line below the current line.
Moves the cursor to the beginning of the previous word. If the cursor is in the middle of a word, the cursor is moved to the beginning of the current word.
Moves the cursor to the end of the next word. If the cursor is in the middle of a word, the cursor is moved to the end of the current word.
Text MenuпѓЃ
Creates a new text Data Block.
Reopens (reloads) the current buffer (all non-saved modifications are lost).
Saves an already open file.
Saves text as a new text file, a File Browser is opened to select the directory to save the file along with giving the file a name and file extension.
Run the text data-block as a Python script on loading the blend-file. Read more about the registration of Python modules in API documentation.
Executes the text as a Python script, see Running Scripts for more information.
Edit MenuпѓЃ
Cuts out the marked text into the text clipboard.
Copies the marked text into the text clipboard.
Pastes the text from the clipboard at the cursor location in the Text editor.
Duplicates the current line.
Swaps the current/selected line(s) with the above.
Swaps the current/selected line(s) with the below.
Shows the Find & Replace panel in the Sidebar.
Finds the next instance of the selected text.
Shows a pop-up, which lets you select a line number where to move the cursor to.
Text Auto Complete Tab
Shows a selectable list of words already used in the text.
Converts the text file to a Text Object either as One Object or One Object Per Line.
Select MenuпѓЃ
Selects the entire text file.
Selects the entire current line.
Word double-click LMB
Selects the entire current word.
Selects everything above the cursor.
Selects everything below the cursor.
Selects everything between the beginning of the current line and the cursor.
Selects everything between the cursor and the end of the current line.
Selects everything between the cursor and the position of the cursor one line above.
Selects everything between the cursor and the position of the cursor one line below.
Selects everything between the cursor and the beginning of the previous word. If the cursor is in the middle of a word, select everything to the beginning of the current word.
Selects everything between the cursor and the end of the next word. If the cursor is in the middle of a word, select everything to the end of the current word.
Format MenuпѓЃ
Inserts a tab character at the cursor.
Unindents the selection.
Toggles whether the selected line(s) are a Python comment. If no lines are selected the current line is toggled.
Converts indentation characters To Spaces or To Tabs.
Template MenuпѓЃ
The Text Editor has some dedicated Python scripts, which are useful for writing tools, like a class/function/variable browser, completion…
Python, OpenShading Language
Main ViewпѓЃ
Typing on the keyboard produces text in the text buffer.
As usual, pressing, dragging and releasing LMB selects text. Pressing RMB opens the context menu.
Usages for the Text editor
The Text editor is handy also when you want to share your blend-files with others. The Text editor can be used to write in a README text explaining the contents of your blend-file. Be sure to keep it visible when saving!
SidebarпѓЃ
Find & ReplaceпѓЃ
Searches for instances of a text that occur after the cursor. Using the eyedropper icon will search for the currently selected text and sets the selection to the match. Find Next searches for the next instance of the text.
Searches for the text specified in Find Text and replaces it with the new text. Using the eyedropper icon will set the currently selected text as the replace text. Replace searches for the next match and replaces it. Replace All searches for the match and replaces all occurrences of the match with the new text.
Search is sensitive to upper-case and lower-case letters.
Search again from the start of the file when reaching the end.
Search in all text data-blocks instead of only the active one.
PropertiesпѓЃ
Shows a right margin to help keep line length at a reasonable length when scripting. The width of the margin is specified in Margin Column.
The size of the font used to display text.
The number of character spaces to display tab characters with.
Use Tabs or Spaces for indentations.
FooterпѓЃ
The Text editor footer displays if the text is saved internal or external and if there are unsaved changes to an external file. For external files, this region also displays the file path to the text file.
UsageпѓЃ
Running ScriptsпѓЃ
© Copyright : This page is licensed under a CC-BY-SA 4.0 Int. License. Last updated on 12/28/2021.
Основные горячие клавиши
Существует ряд сокращений клавиш, общих для всей программы среди многих типов.
В Blender’е RMB (Правая Кнопка Мыши) обычно используется для выбора, а LMB (Левая Кнопка Мыши) инициирует или подтверждает действия.
| RMB | Для выделения элемента. |
| Shift-RMB | Чтобы добавить дополнительные элементы к выбору. |
| LMB | Для осуществления действия с выделенным. |
Наведение курсора мыши
При наведении курсора (когда курсор удерживается над кнопкой).
Свойства
Ctrl-C – Копирует (одиночное) значение из кнопки.
Ctrl-V – Вставляет (одиночное) значение в кнопку.
Ctrl-Alt-C – Копирует весь вектор или цвет кнопки.
Ctrl-Alt-V – Вставляет весь вектор или цвет кнопки.
RMB – Открывает контекстное меню.
Backspace – Очистка значения (устанавливает на ноль или очищает текстовое поле).
Ctrl-Wheel – Меняет значение инкрементных шагов.
Для кнопок всплывающих меню опций, это зацикливает изменение значения.
Return – Активирует меню или переключает значение.
Alt – Удерживайте пока редактируете значения чтобы применить изменение ко всем выбранным элементам (объектам, костям, последовательностям).
Это можно использовать для цифровых кнопок и переключателей.
Анимация
Скриптинг на Python
Ctrl-C – Над какими-либо Кнопки операций копирует их Python команды в буфер обмена.
Это может быть использовано в Консоли Python или в текстовом редакторе при написании скриптов.
Shift-Ctrl-C – Над клавишами свойств копирует путь данных для этого свойства (также доступно из контекстного меню).
Полезно при написании драйверов или скриптов.
Shift-Ctrl-Alt-C – Над клавишами свойств копирует полный путь данных для блока данных и свойство.
Обратите внимание, что в большинстве случаев лучше получить доступ к значениям на основе контекста, а не по имени.
Перетаскивание
Редактирование Текста
Подтверждение и отмена
© Copyright : This page is licensed under a CC-BY-SA 4.0 Int. License.
Text EditorпѓЃ
HeaderпѓЃ
The newly opened Text editor is empty, with a very simple header. More options become available when a text file is created or opened.
Text header with a text loaded. пѓЃ
The standard editor selection button.
Resolves modified file conflicts when an external text file is updated from another program.
Opens the file from drive again, overriding any local changes.
Make Text Internal
Converts the external text data-block into an internal one.
Hides the warning message until the external text file is modified externally again.
A data-block menu to select a text or to create a new one. After that the header will change.
Run Script (play icon)
Toggle display options.
Line Numbers, Word Wrap, Syntax Highlighting
Script Node Update (refresh icon)
When an OSL-file is opened, this updates the Shader Script node with new options and sockets from the script.
View MenuпѓЃ
Displays the text file’s line numbers on the left of the Main View.
Wraps words that are too long to fit into the horizontal space by pushing them to a new “pseudo line”.
Colors special words, in the Main View, that are used in the Python programming language.
Emphasizes the active line by altering the color of the background.
Moves the view and cursor to the start of the text file.
Moves the view and cursor to the end of the text file.
Moves the cursor to the start of the current line.
Moves the cursor to the end of the current line.
Moves the cursor to the same position in the line above the current line.
Moves the cursor to the same position in the line below the current line.
Moves the cursor to the beginning of the previous word. If the cursor is in the middle of a word, the cursor is moved to the beginning of the current word.
Moves the cursor to the end of the next word. If the cursor is in the middle of a word, the cursor is moved to the end of the current word.
Text MenuпѓЃ
Creates a new text Data Block.
Reopens (reloads) the current buffer (all non-saved modifications are lost).
Saves an already open file.
Saves text as a new text file, a File Browser is opened to select the directory to save the file along with giving the file a name and file extension.
Run the text data-block as a Python script on loading the blend-file. Read more about the registration of Python modules in API documentation.
Executes the text as a Python script, see Running Scripts for more information.
Edit MenuпѓЃ
Cuts out the marked text into the text clipboard.
Copies the marked text into the text clipboard.
Pastes the text from the clipboard at the cursor location in the Text editor.
Duplicates the current line.
Swaps the current/selected line(s) with the above.
Swaps the current/selected line(s) with the below.
Shows the Find & Replace panel in the Sidebar.
Finds the next instance of the selected text.
Shows a pop-up, which lets you select a line number where to move the cursor to.
Text Auto Complete Tab
Shows a selectable list of words already used in the text.
Converts the text file to a Text Object either as One Object or One Object Per Line.
Select MenuпѓЃ
Selects the entire text file.
Selects the entire current line.
Word double-click LMB
Selects the entire current word.
Selects everything above the cursor.
Selects everything below the cursor.
Selects everything between the beginning of the current line and the cursor.
Selects everything between the cursor and the end of the current line.
Selects everything between the cursor and the position of the cursor one line above.
Selects everything between the cursor and the position of the cursor one line below.
Selects everything between the cursor and the beginning of the previous word. If the cursor is in the middle of a word, select everything to the beginning of the current word.
Selects everything between the cursor and the end of the next word. If the cursor is in the middle of a word, select everything to the end of the current word.
Format MenuпѓЃ
Inserts a tab character at the cursor.
Unindents the selection.
Toggles whether the selected line(s) are a Python comment. If no lines are selected the current line is toggled.
Converts indentation characters To Spaces or To Tabs.
Template MenuпѓЃ
The Text Editor has some dedicated Python scripts, which are useful for writing tools, like a class/function/variable browser, completion…
Python, OpenShading Language
Main ViewпѓЃ
Typing on the keyboard produces text in the text buffer.
As usual, pressing, dragging and releasing LMB selects text. Pressing RMB opens the context menu.
Usages for the Text editor
The Text editor is handy also when you want to share your blend-files with others. The Text editor can be used to write in a README text explaining the contents of your blend-file. Be sure to keep it visible when saving!
SidebarпѓЃ
Find & ReplaceпѓЃ
Searches for instances of a text that occur after the cursor. Using the eyedropper icon will search for the currently selected text and sets the selection to the match. Find Next searches for the next instance of the text.
Searches for the text specified in Find Text and replaces it with the new text. Using the eyedropper icon will set the currently selected text as the replace text. Replace searches for the next match and replaces it. Replace All searches for the match and replaces all occurrences of the match with the new text.
Search is sensitive to upper-case and lower-case letters.
Search again from the start of the file when reaching the end.
Search in all text data-blocks instead of only the active one.
PropertiesпѓЃ
Shows a right margin to help keep line length at a reasonable length when scripting. The width of the margin is specified in Margin Column.
The size of the font used to display text.
The number of character spaces to display tab characters with.
Use Tabs or Spaces for indentations.
FooterпѓЃ
The Text editor footer displays if the text is saved internal or external and if there are unsaved changes to an external file. For external files, this region also displays the file path to the text file.
UsageпѓЃ
Running ScriptsпѓЃ
© Copyright : This page is licensed under a CC-BY-SA 4.0 Int. License. Last updated on 12/28/2021.