Писать скрипты для Mikrotik RouterOS — это просто
блокировать все TCP соединения на порт 80 по адресу example.com
блокировать все TCP соединения на порт 80 по любому адресу из списка с именем DenyThis
Текст скрипта нужно добавить в репозиторий скриптов, находящийся в разделе /system scripts.
Скрипт выполняется построчно. Каждая строка имеет следующий синтаксис:
[prefix] — «:» — для глобальных комманд, с символа «/» начинается командная строка, которая будет выполняться относительно корня конфигурации, префикс может отсутствовать, тогда командная строка выполняется относительно текущего раздела конфигурации;
[path] — путь до требуемого раздела конфигурации, по которому происходит переход перед выполнением команды;
command — непосредственно действие, выполняемое командной строкой;
[uparam] — безымянный параметр команды;
[param=[value]] — именованные параметры и их значения.
Итак, первым делом, определим параметры работы скрипта в виде переменных. Переменная объявляется командами :local и :global, соответственно получаем локальную переменную, доступную только внутри своей зоны видимости, или глобальную, которая добавляется в список переменных окружения ОС и будет доступна откуда угодно. Локальные переменные живут, пока выполняется их зона видимости, глобальные — пока мы не удалим их.
Переменная DNSList содержит массив доменов, с которым мы хотим работать. Переменная ListName содержит строку, которой будет называться полученный address-list. Переменная DNSServers — содержит массив адресов DNS-серверов, прописанных на роутере или полученных от провайдера при подключении, плюс «восьмёрки» на случай, если на роутере не используется служба DNS, который будет использоваться для получения информации о записях доменов.
В цикле «для каждого» обойдём массив доменов и отрезолвим их IP-адреса на каждом DNS-сервере на случай, если разные DNS отдают разные IP. Конструкцияслужит для отлова runtime-ошибок. Если не использовать её, то скрипт может прервётся при ошибке резолва несуществующего или ошибочного адреса.
перейдём в раздел конфигурации /ip dns cahe all. Там содержатся DNS-кэш роутера в виде таблицы Name — Type — Data — TTL. Выполним отбор по типу — нам требуются только A-записи. И результат отбора обойдём в цикле «для каждого». Это и будет главным циклом нашего скрипта.
Создадим переменные, обновляемые в каждом цикле: два флага — bNew, исключающий дублирования, match, показывающий, входит ли текущая запись кэша в наш список доменов; переменная cacheName содержит поле Name текущей записи кэша, то есть домен.
Обойдём список доменов и для каждого проверим, содержится ли в строке cacheName подстрока в виде домена из этого списка.
Если содержится, установим значение флага match в true.
В заключающем этапе если текущий адрес требует добавления (match установлен в true), то мы его добавляем в список адресов. Коментарий к добавляемой записи будет содержать домен, к которому она относится. При этом выполняем несколько проверок. Если address-list пустой, то добавляем сразу, если что-то там есть, проверяем, нет ли там уже записи с таким IP-адресом и если нет — добавляем.
Список адресов нужно периодически обновлять. Для этого в RouterOS есть диспетчер заданий. Задание можно добавить из консоли или из графического интерфейса winbox
Сценарии работы со списком адресов не ограничиваются созданием правил в фаерволе. Поэтому приведу несколько примеров. Можно выполнять в консоли, можно добавлять мышкой в winbox’е.
Чёрный список:
Статический маршрут до данных узлов
Сбор информации о клиентах
UPD: специально по просьбе turone внёс изменения в скрипт, чтобы адреса DNS-серверов брались из системы.
UPD 24.08.2016: заметил, что в новых версиях RouterOS (начиная с 6.36) появилась возможность указывать в адрес-листах DNS-имена. Так что теперь ценность данного скрипта лишь образовательная.
Sysadminium
База знаний системного администратора
MikroTik. Основы написания скриптов
Это основы написания скриптов для роутеров MikroTik. Функционал их достаточно велик, но его можно расширить с помощью написания скриптов.
Документация и примеры
Описание синтаксиса и примеров вы можете смотреть на следующих страницах:
Хранилище скриптов
В RouterOS есть специальное хранилище для скриптов – /system/script.
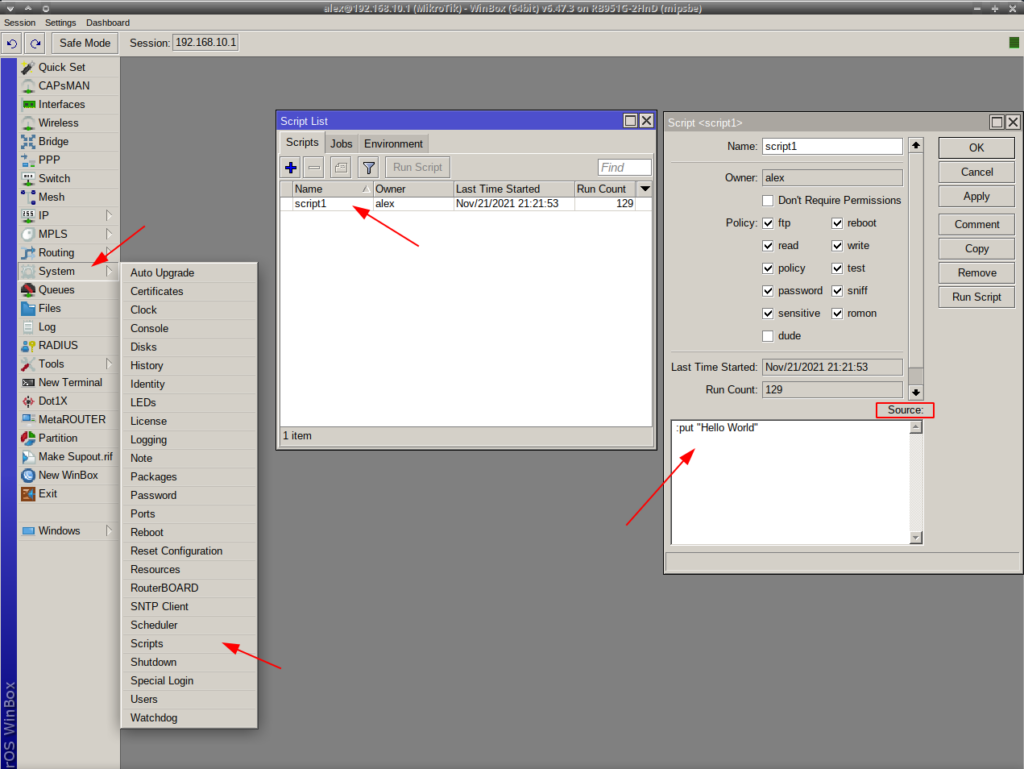 RouterOS – /system/script
Хоть и возможно писать скрипты в окошке “Source“, но это совсем не удобно. А удобно для редактирования скриптов использовать терминал.
Для создания скрипта используется вот такая команда:
А для его редактирования нужно использовать следующую команду:
После выполнения этой команды в терминале откроется текстовый редактор, где вы сможете написать свой скрипт. Например:
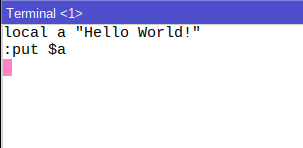
Чтобы сохранить скрипт и закрыть редактор используйте комбинацию клавиш Ctrl+O, а чтобы закрыть редактор без сохранения Ctrl+C.
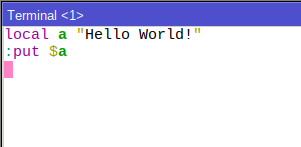
Недостатком такого метода является то, что при написании скрипта не подсвечивается синтаксис. Он начинает подсвечиваться только после сохранения скрипта (Ctrl+O) и последующего его открытия (/system/script/ edit source). При этом новые строки остаются не подсвечиваемыми до нового сохранения скрипта. Это означает что после каждой правки вам придется сохранять и пере-открывать скрипт, чтобы убедиться что нет синтаксических ошибок.
Например предыдущий скрипт после сохранения и последующего открытия выглядит таким образом:
А чтобы запустить наш скрипт нужно использовать следующую команду:

Автоматическое выполнение скриптов
На практике часто требуется выполнять скрипты автоматически в зависимости от каких-либо событий.
Часто скрипты выполняются планировщиком заданий – /system/scheduler.
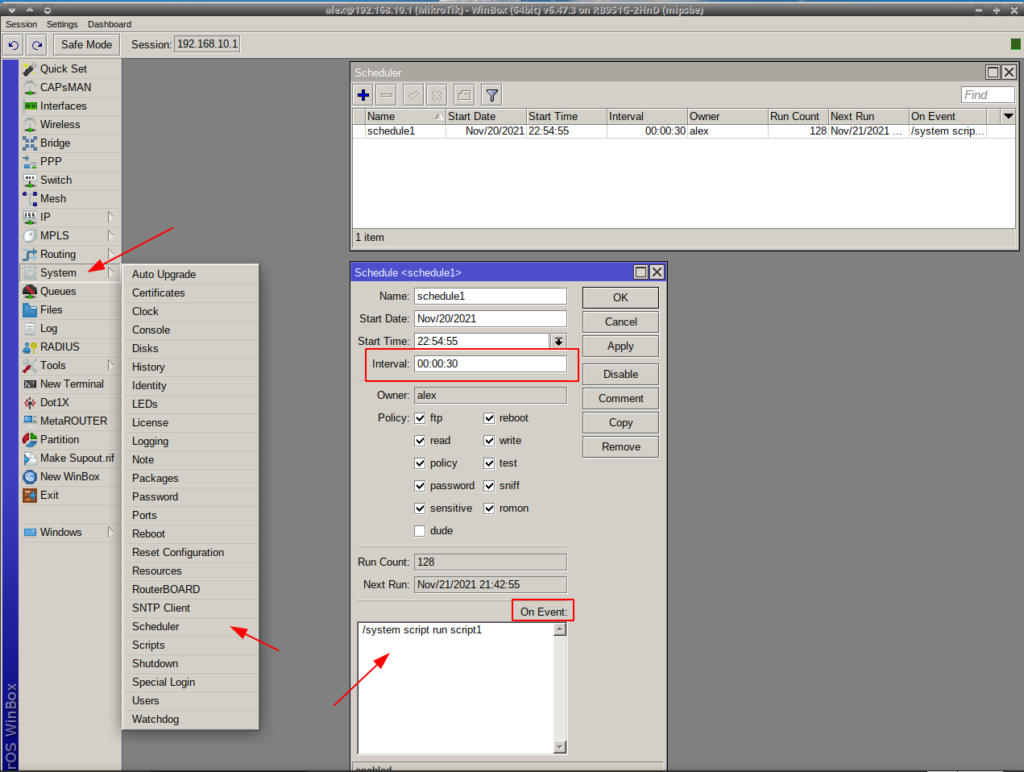 RouterOS – /System/scheduler
В поле “Interval” вы должны ввести интервал повторений, в моём случает интервал равен 30 секундам. А в поле “On Event” пишется скрипт, или можно вызывать скрипт из хранилища, как сделано у меня.
Скрипты могут срабатывать не только по определённому интервалу. Ещё они могут выполняться при наступлении определённых событиях:
Скрипт можно писать либо напрямую в описанных выше пунктах меню, либо вызывать его из хранилища.
Синтаксис
Скрипты в RouterOS это список команд, которые выполняются одна за другой. При этом можно использовать различные инструменты, такие как: переменные разных типов, условные операторы и ветвления, обработка ошибок и тому подобное.
Написание команд
Команды в RouterOS строятся из следующих элементов:
Вначале мы указываем путь к объекту, например ip адреса у нас находятся в /ip/address/.
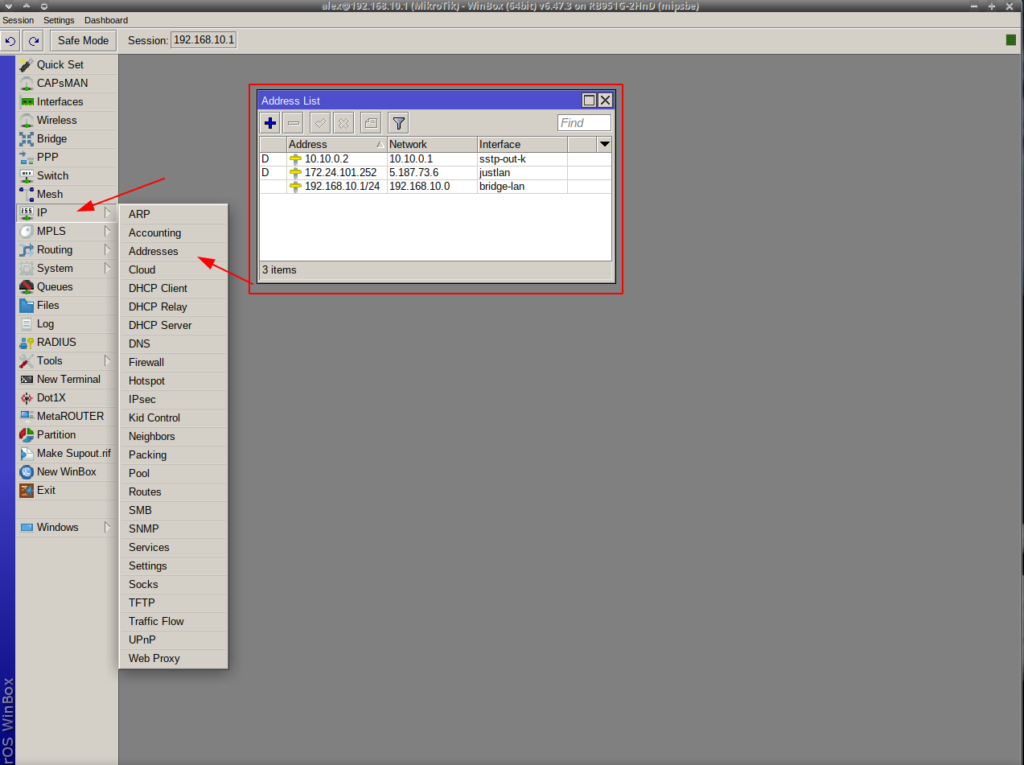 RouterOS – /ip/addresses
Путь до объектов в нашем случае будет таким: /ip addresses. Вначале ставим слеш “/“, а затем между узлами пути ставятся пробелы.
Затем пишем команду, вот примеры возможных команд:
После команды можем написать её параметры, причем вначале нужно использовать параметры без значений, а потом параметры со значениями. Например при добавлении IP-адреса в качестве параметров можно использовать адрес и интерфейс.
Вот некоторые примеры:
Некоторые команды можно использовать без пути, такие как:
Все они, как вы могли заметить, начинаются на двоеточие. Эти команды на примерах рассмотрим ниже!
Кстати, одна команда от другой разделяются либо знаком окончания строки, либо точной с запятой “;“. Я вам рекомендую всегда использовать точку с запятой, чтобы избежать путаницы.
Переменные
Можно использовать локальные и глобальные переменные. Локальные видны в пределах скрипта, а глобальные можно использовать разными скриптами. При объявлении глобальной переменной, она сохраняется в память роутера до перезагрузки.
Локальную или глобальную переменную можно создать таким образом:
Для того чтобы назначить переменной значение используется команда :set:
А чтобы вывести значение переменной на терминал нужно использовать :put и название переменной. Но перед названием переменной нужно поставить знак “$”:
Вот пример однострочного скрипта:
А ещё переменным можно присваивать значения сразу при объявлении.
Массивы
В качестве переменных можно использовать массивы. Массив заключается в круглые скобки, а элементы массива разделяются запятой.
С помощью команды :len можно узнать размер массива, а с помощью :pick вывести определённый элемент массива.
Задержка
При выполнении этого скрипта терминал подождет 10 секунд, а затем на нём появится строка “Hello World!”.
Запись в журнал
В логах, после выполнения этой команды, появится запись “Hello!” в теме “script, info“.
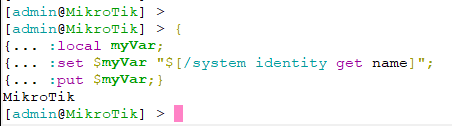
Результат выполнения команды заносим в переменную
В примере выше результат выполнения команды “/system identity get name” будет помещён в переменную “myVar“. А после чего, с помощью команды :put, я вывожу значение переменной в терминал.
Получение свойств объекта
В предыдущем примере используется команда get. Она необходима, чтобы получить свойства объекта.
По пути /system/identity можно указать имя вашего роутера. А с помощью команды “get” мы это имя получаем. То-есть с помощью пути /system identity мы перешли к объекту в котором хранится имя роутера, затем с помощью get мы получаем свойства этого объекта. Но все свойства нам не нужны, поэтому мы используем параметр name, чтобы получить именно имя роутера.
Циклы, блоки команд и условный оператор if
Можно использовать следующие циклы и условные операторы в RouterOS:
Вот пример работы условного оператора :if:
Кстати, блок команд можно брать в фигурные скобки, как показано выше. Это можно применять прям в терминале для составления одной команды (не скрипта). То есть Вы открываете скобку и начинаете записывать ваш скрипт, после чего вы закрываете скобку, нажимаете Enter и скрипт выполняется.
Обработка ошибок
Здесь же продемонстрирован и пример одной команды внутри другой с помощью квадратных скобок. То есть выполняется команда :resolve test.ru, а её результат выводится в терминал с помощью :put. Но если :resolve test.ru завершиться ошибкой, то выполнится блок команд после on-error. И так как test.ru у меня не резолвится, то выполнилась команда :put “resolver failed”.
Обратная связь
Я совсем немного пишу скрипты для роутеров MikroTik, и редко использую терминал, предпочитая ему WinBox. Поэтому если Вы в статье найдёте ошибки или неточности, то напишите в комментариях. И я поправлю или дополню эту статью.
Другие статьи посвященные MikroTik доступны здесь.
MikroTik Скрипт: Уведомление о успешном входе на устройство или простой парсер журнала MikroTik
Статья будет больше интересна специалистам использующим небольшой парк устройств (не использующим отдельный сервер, для системы мониторинга или логирования), домашним пользователям, тем кто в первый раз подступается к написанию скриптов устройства и тем у кого нет времени/желания разбираться.
 Пример email с событиями вход/выход пользователей
Написать свой скрипт меня сподвигло желание упростить монструозные скрипты, которые можно найти по этому запросу в интернете, выполняющие это несложное действие (пример скрипта с Wiki MikroTik), а так же показать почему инженеры MikroTik сделали невозможным простой способ парсинга, если вы не житель Лондона. 🙂
Статья разбирает пример уведомления о входе и выходе пользователя с устройства MikroTik, но так же покажет примеры:
Организация времени в журнале устройства;
Парсинг журнала устройства, поиск событий по критериям;
Отправка уведомлений на электронную почту;
Отправка сообщения Telegram.
Предыстория. Почему скрипты парсинга логов MikroTik «монструозны»?
Под монструозностью будем понимать большой объем логики скрипта и конструкции вида:
Они показывают умение администратора «оптимизировать» код, но здорово усложняют возможности понимания скриптов другими пользователями.
Но самую огромную роль в усложнение логики этого скрипта внесла сама компания MIkroTik, с интересной логикой журнала на устройстве. 🙂
Что может быть проще конструкции: «найди все события по времени старше последнего запуска с темой «account», запущенной простым казахстанцем (UTC+06)?
Это даже будет работать, ровно до 23:59:59 текущего дня. А после 12 ночи, скрипт превратится в тыкву А вот после 00:00:00 система начнет вываливать все события предыдущего дня. Почему?
Инженеры MikroTik большие оригиналы решившие сделать хранение записей журнала следующим образом: система хранит в журнале события сегодняшнего дня только с параметром времени, а чтобы не путаться, когда сменяется день, перезаписывает время событий добавляя дату, во все события «вчерашнего» дня. Для пользователя, в журнале событий все события отображаются дата/время, но сама система, событиям текущего дня присваивает только время.
Ну и где здесь оригинальность? А оригинальность в том, что MikroTik считает началом нового дня время 00:00:00 по UTC±0:00. Игнорируя часовой пояс самого устройства, т.е. у меня (UTC+06), до 6 утра, выдавались все уведомления за предыдущий день. В 06:00:00 Микротик перезаписывал всем событиям дату и скрипт снова начинал корректно работать.
Так что если вы не житель Лондона (UTC±0:00), для парсинга журнала устройства по времени вам приходилось использовать костыли, решая логикой скрипта проблему организации времени на устройстве.
Костыли делать мне не хотелось (в частности однажды это могут исправить), поэтому подумалось над вариантом который был бы проще в работе и проще в понимании другими пользователями.
Логика скрипта
Помимо параметров время события, текст события, MikroTik использует уникальный параметр id события, который мы будем использовать (.id уникален до перезапуска устройства, потом отчет начинается заново, с 0).
Формируем текст email, записывая новой строкой сообщение журнала MikroTik;
Формируем текст Telegram сообщения, используя %0D%0A для переноса строки;
Отправляем сформированное сообщение на email;
Отправляем сформированное сообщение в Telegram;
Записываем в ParseLogAccountEndArrayID последний ID сообщения с темой «account» (EndArrayID).
Создать скрипт
Для запуска скрипта необходимы разрешения: read, write, test, policy.
Код скрипта
Добавление скрипта в Планировщик
Для запуска скрипта необходимы разрешения: read, write, test, policy.
Или выполните в терминале:
Заключение
Надеюсь приведенный скрипт будет вам полезен, вы поймете как легко и просто парсить журнал устройства MikroTik выставляя триггеры по теме сообщения, или тексту сообщения.
Пример Telegram сообщения
Возможные темы сообщений в журнале устройства, можно увидеть попытавшись создать правило Logging:
Для парсинга текста сообщений используйте регулярные выражения и команду вида:
[/log find where message
Установив более частое время проверки скрипта, вы можете выполнить дополнительные действия при входе/выходе пользователя, например автоматическое создание резервной копии (для тех кто любит править Firewall в пятницу вечером, забывая устанавливать MikroTik Safe Mode) или что еще подскажет воображение.
Мой скрипт выглядит проще, чем что я находил в интернете и доступен к оптимизации, если вы любите оптимизировать код в минимальное количество строк.
Если вы используете множество скриптов на вашем устройстве, указывать параметры почты и Telegram бота, в каждом из скриптов нерационально, особенно если возникнет необходимость изменить параметры. Я использую в своих скриптах вызов скриптов функций: «Отправить Email» и «Отправить сообщение Telegram», возможно и Вам это тоже будет полезно, упрощая управление устройством MikroTik.
Работа скрипта проверена на: hAP ac lite, RouterOS 6.47.8 (stable).
UPD 11.12.2020: Выставляйте права на запуск скрипта в Scheduler и на сам скрипт, как указано в статье: read, write, test, policy. Излишние права (выставляются по умолчанию новому скрипту) могут привести к появлению ошибки «could not run script ParseLogAccountEvents: not enough permissions«. Проверяйте журнал устройства.
Scripting
Scripting language manual
This manual provides an introduction to RouterOS’s built-in powerful scripting language.
Scripting host provides a way to automate some router maintenance tasks by means of executing user-defined scripts bounded to some event occurrence.
Scripts can be stored in the Script repository or can be written directly to the console. The events used to trigger script execution include, but are not limited to the System Scheduler, the Traffic Monitoring Tool, and the Netwatch Tool generated events.
If you are already familiar with scripting in RouterOS, you might want to see our Tips & Tricks.
Line structure
RouterOS script is divided into a number of command lines. Command lines are executed one by one until the end of the script or until a runtime error occurs.
Command-line
RouterOS console uses the following command syntax:
The end of the command line is represented by the token “;” or NEWLINE. Sometimes “;” or NEWLINE is not required to end the command line.
Single command inside (), [] or <> does not require any end of command character. The end of the command is determined by the content of the whole script
Each command line inside another command line starts and ends with square brackets «[ ]» (command concatenation).
Notice that the code above contains three command lines:
Command-line can be constructed from more than one physical line by following line joining rules.
Physical Line
A physical line is a sequence of characters terminated by an end-of-line (EOL) sequence. Any of the standard platform line termination sequences can be used:
Standard C conventions for newline characters can be used ( the \n character).
Comments
The following rules apply to a comment:
Example
Line joining
Two or more physical lines may be joined into logical lines using the backslash character (\).
The following rules apply to use backslash as a line joining tool:
Example
Whitespace between tokens
Whitespace can be used to separate tokens. Whitespace is necessary between two tokens only if their concatenation could be interpreted as a different token. Example:
Whitespace characters are not allowed
Scopes
Global scope
Global scope or root scope is the default scope of the script. It is created automatically and can not be turned off.
Local scope
User can define their own groups to block access to certain variables, these scopes are called local scopes. Each local scope is enclosed in curly braces («< >«).
In the code above variable, b has local scope and will not be accessible after a closing curly brace.
So for example, the defined local variable will not be visible in the next command line and will generate a syntax error
Note that even variable can be defined as global, it will be available only from its scope unless it is not already defined.
The code above will generate an expected result because the accessibility of variable «b» and its value will end after the end of the scope.
Keywords
The following words are keywords and cannot be used as variable and function names:
Delimiters
The following tokens serve as delimiters in the grammar:
Data types
RouterOS scripting language has the following data types:
Constant Escape Sequences
Following escape sequences can be used to define certain special characters within a string:
Example
which will show on display
HELLO
This
is
a
test
Operators
Arithmetic Operators
Usual arithmetic operators are supported in RouterOS scripting language
| Operator | Description | Example |
|---|---|---|
| «+» | binary addition | :put (3+4); |
| «-« | binary subtraction | :put (1-6); |
| «*» | binary multiplication | :put (4*5); |
| «/» | binary division | :put (10 / 2); :put ((10)/2) |
| «%» | modulo operation | :put (5 % 3); |
| «-« | unary negation |
Note: for the division to work you have to use braces or spaces around the dividend so it is not mistaken as an IP address
Relational Operators
| Operator | Description | Example |
|---|---|---|
| » :put (3 | ||
| «>» | greater | :put (3>4); |
| «=» | equal | :put (2=2); |
| » =» | greater or equal | |
| «!=» | not equal |
Logical Operators
| Operator | Description | Example |
|---|---|---|
| “!” | logical NOT | :put (!true); |
| “&&”, “and” | logical AND | :put (true&&true) |
| “||”, “or” | logical OR | :put (true||false); |
| “in” | :put (1.1.1.1/32 in 1.0.0.0/8); |
Bitwise Operators
Bitwise operators are working on number, IP, and IPv6 address data types.
::ffff)
:put (2001::1|::ffff)
:put (2001::ffff:1^::ffff:0)
:put (2001::1111&ffff::)
Calculate subnet address from given IP and CIDR Netmask using «&» operator:
Get the last 8 bits from the given IP addresses:
Use the «|» operator and inverted CIDR mask to calculate the broadcast address:
Concatenation Operators
It is possible to add variable values to strings without a concatenation operator:
Other Operators
”
/ip route print where gateway
«^[0-9 \\.]*202\$»
Variables
The scripting language has two types of variables:
Note: Starting from v6.2 there can be undefined variables. When a variable is undefined, the parser will try to look for variables set, for example, by DHCP lease-script or Hotspot on-login
Note: Variable value size is limited to 4096bytes
Every variable, except for built-in RouterOS variables, must be declared before usage by local or global keywords. Undefined variables will be marked as undefined and will result in a compilation error. Example:
The exception is when using variables set, for example, by DHCP lease-script
Valid characters in variable names are letters and digits. If the variable name contains any other character, then the variable name should be put in double quotes. Example:
If a variable is initially defined without value then the variable data type is set to nil, otherwise, a data type is determined automatically by the scripting engine. Sometimes conversion from one data type to another is required. It can be achieved using data conversion commands. Example:
Variable names are case-sensitive.
Set command without value will un-define the variable (remove from environment, new in v6.2)
Use quotes on the full variable name when the name of the variable contains operators. Example:
Reserved variable names
All built-in RouterOS properties are reserved variables. Variables that will be defined the same as the RouterOS built-in properties can cause errors. To avoid such errors, use custom designations.
For example, the following script will not work:
But will work with different defined variables:
Commands
Global commands
Every global command should start with the «:» token, otherwise it will be treated as a variable.
Menu specific commands
Common commands
Following commands available from most sub-menus:
=
=
=
=[ ]
import
The import command is available from the root menu and is used to import configuration from files created by an export command or written manually by hand.
print parameters
Several parameters are available for print command:
| Parameter | Description | Example |
|---|---|---|
| append | ||
| as-value | print output as an array of parameters and its values | :put [/ip address print as-value] |
| brief | print brief description | |
| detail | print detailed description, the output is not as readable as brief output but may be useful to view all parameters | |
| count-only | print only count of menu items | |
| file | print output to file | |
| follow | print all current entries and track new entries until ctrl-c is pressed, very useful when viewing log entries | /log print follow |
| follow-only | print and track only new entries until ctrl-c is pressed, very useful when viewing log entries | /log print follow-only |
| from | print parameters only from specified item | /user print from=admin |
| interval | continuously print output in a selected time interval, useful to track down changes where follow is not acceptable | /interface print interval=2 |
| terse | show details in a compact and machine-friendly format | |
| value-list | show values one per line (good for parsing purposes) | |
| without-paging | If the output does not fit in the console screen then do not stop, print all information in one piece | |
| where | expressions followed by where parameters can be used to filter outmatched entries | /ip route print where interface=»ether1″ |
More than one parameter can be specified at a time, for example, /ip route print count-only interval=1 where interface=»ether1″
Loops and conditional statements
Loops
| Command | Syntax | Description |
|---|---|---|
| do..while | :do < >while=( ); :while ( ) do=< >; | execute commands until a given condition is met. |
| for | :for from= to= step= do= | execute commands over a given number of iterations |
| foreach | :foreach in= do=< >; | execute commands for each element in a list |
Conditional statement
| Command | Syntax | Description |
|---|---|---|
| if | :if ( ) do= < >else= | If a given condition is true then execute commands in the do block, otherwise execute commands in the else block if specified. |
Functions
Scripting language does not allow to create functions directly, however, you could use: parse command as a workaround.
Starting from v6.2 new syntax is added to easier define such functions and even pass parameters. It is also possible to return function value with :return command.
See examples below:
Notice that there are two ways how to pass arguments:
Return example
You can even clone an existing script from the script environment and use it as a function.
The output will be:
Nested function example
Note: to call another function its name needs to be declared (the same as for variables)
Catch run-time errors
Starting from v6.2 scripting has the ability to catch run-time errors.
For example, the [code]:reslove[/code] command if failed will throw an error and break the script.
Now we want to catch this error and proceed with our script:
Operations with Arrays
Warning: Key name in the array contains any character other than lowercase character, it should be put in quotes
Loop through keys and values
«foreach» command can be used to loop through keys and elements:
If the «foreach» command is used with one argument, then the element value will be returned:
Note: If the array element has a key then these elements are sorted in alphabetical order, elements without keys are moved before elements with keys and their order is not changed (see example above).
Change the value of a single array element
Script repository
Sub-menu level: /system script
Contains all user-created scripts. Scripts can be executed in several different ways:
Note: Only scripts (including schedulers, netwatch, etc) with equal or higher permission rights can execute other scripts.
Read more detailed policy descriptions here
Read-only status properties:
| Property | Description |
|---|---|
| last-started (date) | Date and time when the script was last invoked. |
| owner (string) | The user who created the script |
| run-count (integer) | Counter that counts how many times script has been executed |
Menu specific commands
| Command | Description |
|---|---|
| run (run [id|name]) | Execute the specified script by ID or name |
Environment
Sub-menu level:
Contains all user-defined variables and their assigned values.
Read-only status properties:
| Property | Description |
|---|---|
| name (string) | Variable name |
| user (string) | The user who defined variable |
| value () | The value assigned to a variable |
Sub-menu level: /system script job
Contains a list of all currently running scripts.
Read-only status properties: